3D printed horn experiments

I’ve heard about construction materials going up, what percentage did plywood jump up? I’m looking to buy some walnut 3/4 ply to build an “entertainment center”/cabinet for all my gear.
Excited for ya too!

I bought 5x5 sheets for this project because I could have a bit less waste that way. From the same supplier a year ago they were $60 each. They were $90 each when I bought them this week.
 
The bc pine I am using is up to 60 a sheet, I used by nice birch for the same.
And not an unwarped piece of coarse.... 😓
 
Well after some long hours today I'm more or less ready to make all the connections and see how I did- though disappointingly it'll have to wait until tomorrow since the finish on the cabinets is still off-gassing some nasty smells.

It was hard to be patient to be honest but I'm hoping to have as smooth a transition as possible to the... somewhat larger cabinets in the apartment and don't want to stack the deck against them on account of smell!

Tomorrow I'll just need to zip the drivers onto the baffle, connect the wires, and screw the baffles onto the cabs. Oh, I still haven't settled on damping option either so I'll have to make a choice there. Definitely want to go minimalist, either going to do just the back wall or something suspended in the middle like the "ol felt blanket".

Here's a shot of the empty cabs for now!

IMG_20210502_190126.jpg
 
You biscuited the miters? Good idea and the cabinets are coming along nicely.
What did you choose for the clear coat?
 
You biscuited the miters? Good idea and the cabinets are coming along nicely.
What did you choose for the clear coat?

Yes it's a "spline", just a skinny rip of 3/16" Luon that runs the full length of the miter. Adds a lot of strength once it's all glued together and helps hugely with alignment for assembly. Best of all it doesn't require any extra tools beyond your table saw!

Clear coat is just tung oil, I tend to keep it simple with wood finishes and prefer coatings that don't build up too heavy a layer or start to look plastic. I also like that you can just wipe on another coat whenever the fancy strikes, I tend to use walnut oil for those "maintenance layers" because it's food safe and can be applied right in your living room, but is still a hardening oil that cures in time.
 
I’ve heard about construction materials going up, what percentage did plywood jump up? I’m looking to buy some walnut 3/4 ply to build an “entertainment center”/cabinet for all my gear.
Excited for ya too!
I know that Home Depot has had prices change dramatically in a short period for things like 2x4’s and standard types of sheet goods here in Phoenix Arizona but the local Baltic birch supplier has been unaffected so far. The place I go to is a warehouse wood supplier for cabinet makers. Far better selection and prices in my experience and worth seeking out. I just started with a google search for Baltic Birch near me and found several places to compare. They carry all kinds of veneered 3/4” ply too.
 
IMG_20210503_204115.jpg
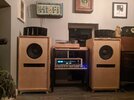
Got the new cabinets into the apartment today! Boy, wasn't easy carrying these beasts up the stairs...

Very excited to be giving everything an audition right now. Having never built my own cabinets before there was a part of me that was terrified I was going to hook everything up and have it sound awful, but it sounds great! Big improvement over the Boleros...

Crossover is pretty close I think, immediately after turning them on the horns still seemed to be overpowering the 414s so I might try swapping a bit more pad into the circuit, I bought more resistors figuring this might be the case... Going to let it all settle in for a few days though first and see if the sound changes. Might just be my ears but the 414s already seem livelier after just a few albums... they are brand new recones and all 🤷

Gotta hustle on getting the grilles made, I'm hoping having a different color on the front might break up their monolithic appearance and "slim them down". Fair to say my wife does not love their size...

Boy I love them though!
 
Can you share some more details about your cabinet choices? Volume, port size and location and how you came up with this design for your 414’s? I’ve got some 414 8b’s I’m sitting on while I wait for crossover parts and I haven’t decided yet on box volume. Curious 🤨

I took most of my cues from the old Altec literature that you can find on the Lansing library, balanced with some design decisions tuned to my specific needs- mainly that they be deep enough to seat my printed horns on and that the overall footprint "appear" not that much larger than the Boleros they replaced (I think I failed in that account but it was a tall goal). I have a really small space, but I shot for 6 cu ft. as something that seemed Goldilocks on the range of possible volumes and also in the ballpark of a Petite Onken (not counting the fancy extra outside bits). So the outside measurements are 20" W x 18.5" D x 36" H. Altec generally recommends a width twice the size of your woofer which is why you often see cabs for these with a 24" wide face, but that wasn't going to fly in my space so I settled for 20". My old Boleros were on stands that I built and topped out at 39", which put the horns right at ear level when I'm seated so I stuck with this. The legs are 3" tall which gets us to that target. 18.5" deep is space for the horn and then just shifted to match the target volume.

That same Altec literature has a chart with recommended port sizes for given volumes and free standing resonances of all their drivers from that time, as well as volumes for the drivers that you can subtract from your total. The chart is a little hard to read but I interpreted 35 sq. Inches as the intersection of the 414 resonance and 6 cu ft. You can make the port any shape you want really as long as it hits this target area, though they don't recommend exceeding a 5:1 height to length ratio I think it is. They also recommend placing it 2" below the rim of the speaker though I don't know why, there seem to be plenty of examples in their own catalog of cabinets that place it elsewhere. I went with 3" to put a bit more meat between the two holes so I could sneak a brace in there. 🤷 I put the speaker up high to keep it closer to the horn and ear level.

That should cover most of it. Keep in mind I'm a total newbie just trying to do the best research I can and might not have built the best possible cabinet... though so far it seems to sound pretty good! This might be obvious but keep in mind that your target volume is based on interior measurements, so subtract 2x your material thickness in every dimension. Don't forget to factor in details such as the inset of your front baffle if you do choose to do so and subtract accordingly. To be honest, I didn't calculate volume occupied by bracing because I kept it quite minimal and just decided to throw caution to the wind at that point. 32 square inches vs. 35? Seems a crap shoot for a first timer. But if you are building a heavily braced design that will add up!

Let me know if you have other questions! Happy to share the bits I've learned hanging out around here.
 
View attachment 36036
Got the new cabinets into the apartment today! Boy, wasn't easy carrying these beasts up the stairs...

Very excited to be giving everything an audition right now. Having never built my own cabinets before there was a part of me that was terrified I was going to hook everything up and have it sound awful, but it sounds great! Big improvement over the Boleros...

Crossover is pretty close I think, immediately after turning them on the horns still seemed to be overpowering the 414s so I might try swapping a bit more pad into the circuit, I bought more resistors figuring this might be the case... Going to let it all settle in for a few days though first and see if the sound changes. Might just be my ears but the 414s already seem livelier after just a few albums... they are brand new recones and all 🤷

Gotta hustle on getting the grilles made, I'm hoping having a different color on the front might break up their monolithic appearance and "slim them down". Fair to say my wife does not love their size...

Boy I love them though!
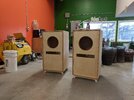
They look pretty good from where I’m sitting. Maybe get the wife’s opinion on the grill cloth? (Happy wife, happy life?)

I know that Home Depot has had prices change dramatically in a short period for things like 2x4’s and standard types of sheet goods here in Phoenix Arizona but the local Baltic birch supplier has been unaffected so far. The place I go to is a warehouse wood supplier for cabinet makers. Far better selection and prices in my experience and worth seeking out. I just started with a google search for Baltic Birch near me and found several places to compare. They carry all kinds of veneered 3/4” ply too.
Curious as to what place this is? I called around a few places and was shocked at the prices of 3/4 ply.
 
Curious as to what place this is? I called around a few places and was shocked at the prices of 3/4 ply.
Spellman Hardwoods had substantially lower prices on Baltic Birch recently and a rep commented that they are not affected by the same influences as Home Depot and don’t mark up their prices like other specialty Hardwood suppliers.

However, I called to check again today and looks like they’re finally feeling the effects of whatever is going on with the wood market. 3/4”(ish) 5’x5’ Baltic Birch is now going for about $66 a sheet. Was a lot cheaper. I don’t know about veneered walnut ply.
 
Bits of progress on unfinished details this weekend/past week:

Made a new revision of the crossover network after urging by the ever patient and encouraging @jrocker to get an app on my phone to analyze the driver frequencies and use the data to fine tune my component values. A bit more empirical than I tend to roll but I can't argue with the superior results.

In the realm of eye candy I was able to complete my grills after my cloth got lost in the mail for a few days. I had made the wooden frames on Friday but couldn't fit the cloth until this evening. It was my first time stretching grill fabric and it's certainly not perfect but I'll live with it for now. I flush set round magnets into the back of the frame that line up with the baffle screws to hold the grills in place.

A future revision would feature stronger magnets for a bit more positive reinforcement, I was afraid they'd be too strong and ended up undersizing them. I think I would also be tempted to make the frames a bit wider. They are 13/16" wide and 1/2" thick birch which I sized to be just shy of proud with the front edge but they are not stiff enough to withstand serious stretching of the cloth without bowing, which makes that job quite tough. Any bow shows up in the shadow line gap to the plywood edge.

The cat you see pictured (Gus) is probably going to claw them as soon as I go to bed anyway...

Will likely now paint the baffle black to make it fade and help the color of the cloth pop a bit better. It is oxblood but it is hard to tell, especially in daylight.

Next on the list is stylish horn mounts, and still pondering edge banding the plywood on the front. At first I was certain I would, then I started thinking I could embrace the plywood all Frank Lloyd Wright, now that it's bordered by real wood I'm tempted to go veneer again...

Just waiting for the stars to align for the next time my wife is away and so are the neighbors so I can really see what they sound like with a bit of volume behind them... 🤓

IMG_20210510_195059.jpg
 
IMG_20210822_141606.jpg

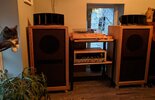
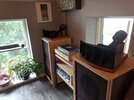
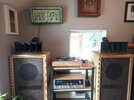
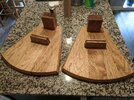
Well it took me about three months but I finally found some time this weekend to build some mounts for my horns.

Used 5/4 wormy butternut because it was about a third the price of walnut and ends up looking pretty similar (same family, juglans)


No fancy joinery, just a few different glue-ups to create the support where needed. Templated the angles for the support column for the driver with scraps, then cut the angles before gluing the two pieces together to make the 90. Base is three pieces, sized to center the posts and lock them in once it's all glued. Additional support for the body of the horn in the form of a block with a groove that catches the bottom of the horn flange. Front of the horn just touches down on the chamfer on the front radius. Also drilled a hole through the post in the back so I could fashion a wire "leash" on the studs for the compression driver just for extra insurance against my cats shenanigans, though I don't really think it's necessary, they click into place pretty nicely!

Very happy to have crossed this detail of the checklist!

IMG_20210822_141710.jpg
 

Attachments

  • IMG_20210822_122715.jpg
    IMG_20210822_122715.jpg
    812.7 KB · Views: 21
Gorgeous looking system. How do they sound? Inquiring minds want to know. ;)
Thanks Trieu! Couldn't have done it without you, of course! Still planning on doing one more print of the horns with a smaller layer height and some fancy material - I was thinking of trying polycarbonate but I also have some glass filled polycarbonate and carbon fiber filled PC as well... the glass filled is supposed to have really exceptional damping characteristics.

As for how it sounds now though? Absolutely lovely! Super detailed and full sounding to my ears, with still a bit of that element that I liked with the larger horns I printed first (WP12024? I forget the designation) of "space" like I can tell the size of the room the recording was made in...

I suspect that the best thing I could do for the sound is get a larger apartment and have more room between me and the speakers. Much of the beam of the horns (the two far most right cells on the right, for example) are directed in ways that they don't really reach my ears.

Wish we were close enough that I could invite you over for a listen! Of course, if you ever end up in Vermont...
 
Much of the beam of the horns (the two far most right cells on the right, for example) are directed in ways that they don't really reach my ears.
Depending on your room geometries and your listening positions, may want to experiment with toe-ing in the horns.
 
Depending on your room geometries and your listening positions, may want to experiment with toe-ing in the horns.
Hmmm slightly more involved process now that they are fixed in the sleds and the sleds are screwed to the cabinets 😁 probably could get up to ten degrees of rotation if you unscrewed them though, before the edge of the sled hits the edge of the cabinet. Probably easier to just toe in the whole cabinet, eh?
 
Back
Top