Printed this out and tried it. Sounded much better than it has the right to. My teenage daughter took one look and said she wanted it! Guess I am still cool dad. ")

That's really cool.Printed this out and tried it. Sounded much better than it has the right to. My teenage daughter took one look and said she wanted it! Guess I am still cool dad.
View attachment 19369


Agreed. I like to be able to print out and validate my designs before releasing them.No reason not to be in it for the long game.
The assembled horn is 20 1/2" wide, 8 1/2" tall and 15 1/2" deep. Each horn section took 25 hours to print. The throat took about 17 hours.
View attachment 19403
")


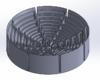
Maybe it needs mini/medium/large horns on the outlets?The first one was louder and sounded better. But, it was directional. This one still has a bit of the "tinny" sound. But, overall was much warmer than just direct from the phone and you can walk around it. I tested it by calling and talked to my son in a different room. The sound was fine (not hifi of course). I was imagining having it sitting in the center of a small conference/kitchen table.
Spot on. For this go-around, I wanted to test the researchers' claim and the omni-directional property of such a design.Maybe it needs mini/medium/large horns on the outlets?

Oh yes..Waiting for the printers to print, the VDCH reflector to dry.... Might as well work on the vector file for the Altec man. It's such a cool graphic. Not sure what to do with him yet.
View attachment 19275